Triple Extraction with bert4keras
When I was developing bert4keras, I promised that I would gradually migrate the examples previously implemented with keras-bert over to bert4keras. One of those earlier examples was the triple extraction task. By now the examples for bert4keras have grown fairly rich, but there was still nothing covering sequence labeling or information extraction, and triple extraction happens to be exactly that kind of task—so I've filled in that gap.
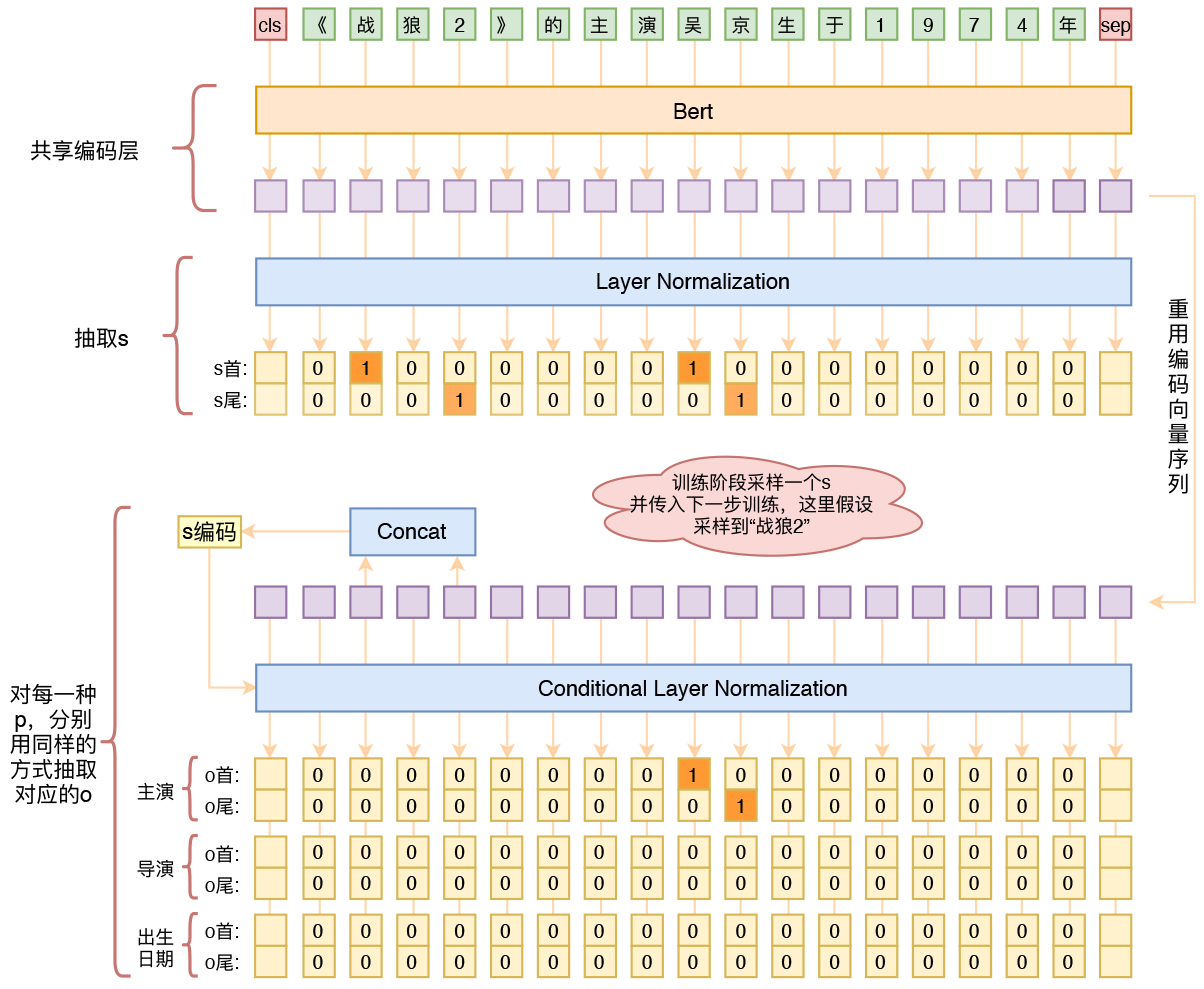 Schematic diagram of the Bert-based triple extraction model, more
Model Overview
The data format and the basic idea behind the model have already been described in detail in A Lightweight Information Extraction Model Based on DGCNN and Probabilistic Graphs, so I won't repeat that here. Baidu has made the dataset public, and it can be downloaded here.
As with the previous strategy, the model still performs extraction using the "half-pointer, half-tagging" approach: first extract s, then feed s back in to extract o and p. The only difference is that the overall architecture is now based on Bert:
1. After the raw sequence is converted to ids, it is fed into Bert's encoder to obtain the encoded sequence;
2. The encoded sequence is passed through two binary classifiers to predict s;
3. Based on the given s, the encoding vectors corresponding to the start and end of s are extracted from the encoded sequence;
4. Using the encoding vector of s as the condition, a conditional Layer Norm is applied to the encoded sequence;
5. The sequence after conditional Layer Norm is used to predict the o and p corresponding to that s.
Class Imbalance
It's not hard to see that, when using the "half-pointer, half-tagging" structure for entity extraction, one runs into a class imbalance problem: target entity words are usually far fewer than non-target words, so label 1 is much rarer than label 0. Common approaches to handling imbalance can all be used here—for example focal loss or manually adjusting class weights—but after applying these methods, the threshold becomes hard to determine. Here I used a method that I think is fairly appropriate: raising the probability value to the $n$-th power.
Specifically, suppose the original output is a probability value $p$, representing the probability of class 1 as $p$. I now change it to $p^n$—that is, I treat the probability of class 1 as $p^n$—leaving everything else unchanged, and the loss is still the ordinary binary cross-entropy loss. Since we already have $0\leq p \leq 1$, $p^n$ as a whole will be closer to 0, so the initial state already matches the target distribution, which in turn speeds up convergence.
We can also compare the two from the perspective of the loss. Suppose the label is $t\in\{0, 1\}$; then the original loss is:
\begin{equation}- t \log p - (1 - t) \log (1 - p)\end{equation}
and after raising it to the $n$-th power, the loss becomes
\begin{equation}- t \log p^n - (1 - t) \log (1 - p^n)\end{equation}
Note that $- t \log p^n = -nt \log p$, so when the label is 1, this effectively amplifies the loss weight, while when the label is 0, $(1 - p^n)$ is closer to 1, so the corresponding loss $\log(1 - p^n)$ is smaller (and so is the gradient). This can therefore be seen as a way of adaptively adjusting the loss weight (i.e., the gradient weight).
Compared with focal loss or manually tuned class weights, the advantage of this approach is that it brings the distribution closer to the target without altering the distribution of the original inner product ($p$ is typically obtained via an inner product followed by sigmoid), and leaving the inner-product distribution unchanged is generally friendlier for optimization.
Source Code and Results
Github: task_relation_extraction.py
Without any pre- or post-processing, the final F1 on the validation set was 0.822, which is basically better than all the previous DGCNN models. Note that this is without any pre- or post-processing at all; if some were added, the F1 could probably reach around 0.83.
At the same time, we can see that there are quite a few labeling errors and omissions in both the training and validation sets. Back when we took part in the competition, the labeling quality of the online test set was actually higher than that of the training and validation sets (more standardized and more complete), so the F1 on the submitted test results back then was typically 4%–5% higher than the F1 on the offline validation set. In other words, with a few rule-based corrections added, if this result were submitted to that leaderboard, a single model would probably have achieved an F1 of around 0.87.
Points Worth Noting
As mentioned at the start, I had already written an example of extracting triples with Bert using keras-bert before. Here I'd like to focus on how the model in this post differs from that earlier example, and a few things worth paying attention to.
The first difference is that, back then, it was just a quick, simple attempt: the vector for s was simply added into the encoded sequence before predicting o and p, rather than using conditional Layer Norm as in this post. The conditional Layer Norm approach has better expressive power, and gives a slight improvement in performance.
The second difference—and something worth noting—is that the model in this post uses the standard Bert tokenizer, whereas the earlier example simply split the text character by character. The sequence produced by the standard tokenizer is not simply a character-by-character split; especially in the case of English words and numbers, the resulting tokenization is not aligned with the characters of the original sequence. So when constructing training samples and producing output, this point needs particular care.
Readers might wonder: why not just go back to splitting by character as before? My view is that if you're going to use Bert, you should follow Bert's own tokenizer—even if the tokens aren't aligned with the original characters, there are ways to handle that properly. The earlier character-by-character splitting was really just an unrefined practice stemming from my not yet being familiar enough with Bert at the time, and it's not something worth recommending. Following Bert's tokenizer may well also yield better fine-tuning results than forcing a character-level split of your own.
Beyond that, I also came across a somewhat unexpected fact: the vocabulary file (vocab.txt) that comes with the Chinese Bert model is incomplete. For instance, the character 箓 in 符箓 ("talisman") is not in Bert's vocab.txt. So when producing the final output, it's best not to use the tokenizer's built-in decode method, and instead map directly back to the original sequence, slicing out the output from there.
Finally, this version of the model's training also incorporated weight moving average, which stabilizes training and can even slightly improve the model's performance. For more on weight moving average, see here.
Summary
This post presented an example of doing triple extraction with bert4keras, and pointed out a number of things worth paying attention to. Feel free to try it out and give feedback.
Translated automatically with claude-sonnet-5; all equations are reproduced verbatim from the source. Copyright remains with the original author.