OCR Technology, a Brief Exploration: 6. Optical Recognition
Having completed the first two steps, we are now able to locate the regions of individual characters in an image, and can move on to building a corresponding model for recognizing single characters.
Model Selection
For the model itself, we chose a convolutional neural network from the deep learning family, building a single-character recognition model out of multiple convolutional layers.
Convolutional neural networks are a type of artificial neural network that has become the dominant model in the field of image recognition today. Through local receptive fields and weight sharing, they reduce the complexity of the network and the number of parameters, making the network structure more similar to biological neural networks — which hints that they are bound to perform better. In fact, our main reasons for choosing convolutional neural networks are:
1. Automatic feature extraction from raw images. A convolutional neural network can take the raw image directly as input, eliminating the manual feature-extraction step that is such a difficult core part of traditional models.
2. Higher accuracy than traditional models. For example, in the MNIST handwritten digit recognition task, accuracy above 99% can be achieved, far exceeding that of traditional models.
3. Better generalization than traditional models. This means that image deformations (scaling, rotation) and noise in the image have little noticeable effect on the recognition results, which is exactly what a good OCR system needs.
Training Data
Training a good model requires a sufficiently large amount of training data. Fortunately, although no ready-made dataset was available, since we were only dealing with printed-font recognition, we were able to generate a batch of training data automatically using a computer. Through the following steps, we built a fairly substantial set of training data:
1. More detail. Since the structure of Chinese characters is more complex than that of digits or English letters, in order to capture more detailed information I used $48\times 48$ grayscale images to construct the samples used as model input.
2. Common characters. To ensure the model's practical usefulness, we crawled hundreds of thousands of articles from WeChat public accounts, merged them, and computed the frequency of each character. We then selected the 3000 most frequent characters (in this article we only consider simplified characters), plus the 26 letters (uppercase and lowercase) and 10 digits, giving 3062 characters in total as the model's output classes.
3. Sufficient data. We manually collected 45 different fonts, ranging from standard Song and Hei typefaces and regular script to irregular handwritten styles, which together give fairly comprehensive coverage of the printed fonts in common use.
4. Artificial noise. For each font we generated images at 5 different font sizes (46 to 50), with 2 images per size, and to further improve the model's generalization ability, we added 5% random noise to every sample.
Following the steps above, we generated a total of $3062\times 45\times 5\times 2=1377900$ samples for training, which shows that the amount of data is indeed sufficient.
Model Architecture
For the model architecture, there is prior work we can draw on. A similar example is MNIST handwritten digit recognition — which is often used as a "touchstone" for new image recognition models — where the task is to recognize over sixty thousand handwritten digit images of size $28\times 28$ pixels. This case bears some similarity to our task of building a Chinese character recognition system, so we could borrow ideas from it for the model architecture. A common convolutional neural network architecture for recognizing MNIST handwritten digits is shown below:
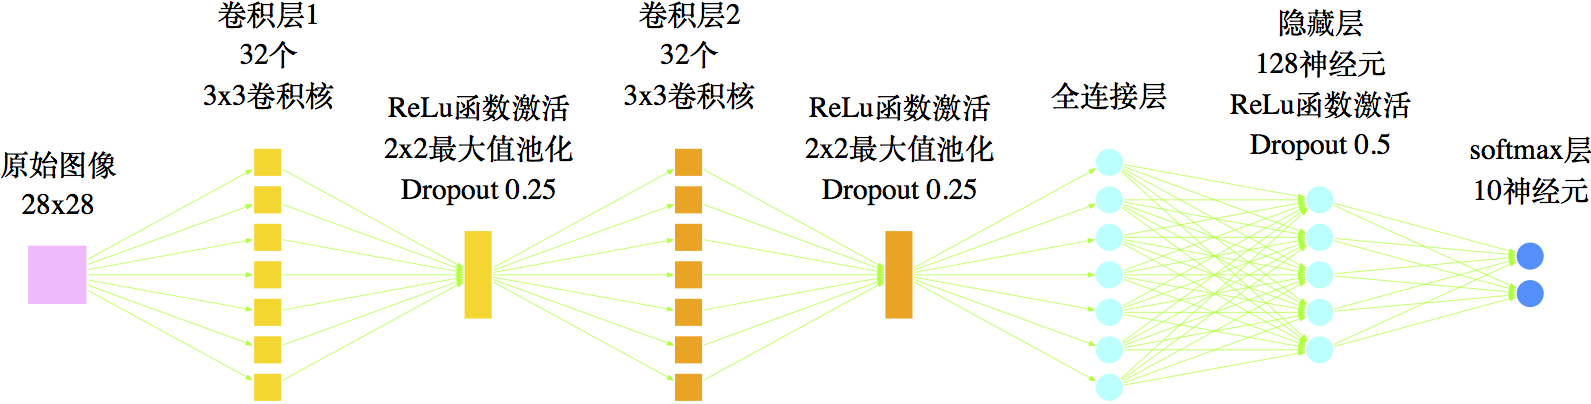 Figure 17: A network architecture used for MNIST handwritten digit recognition
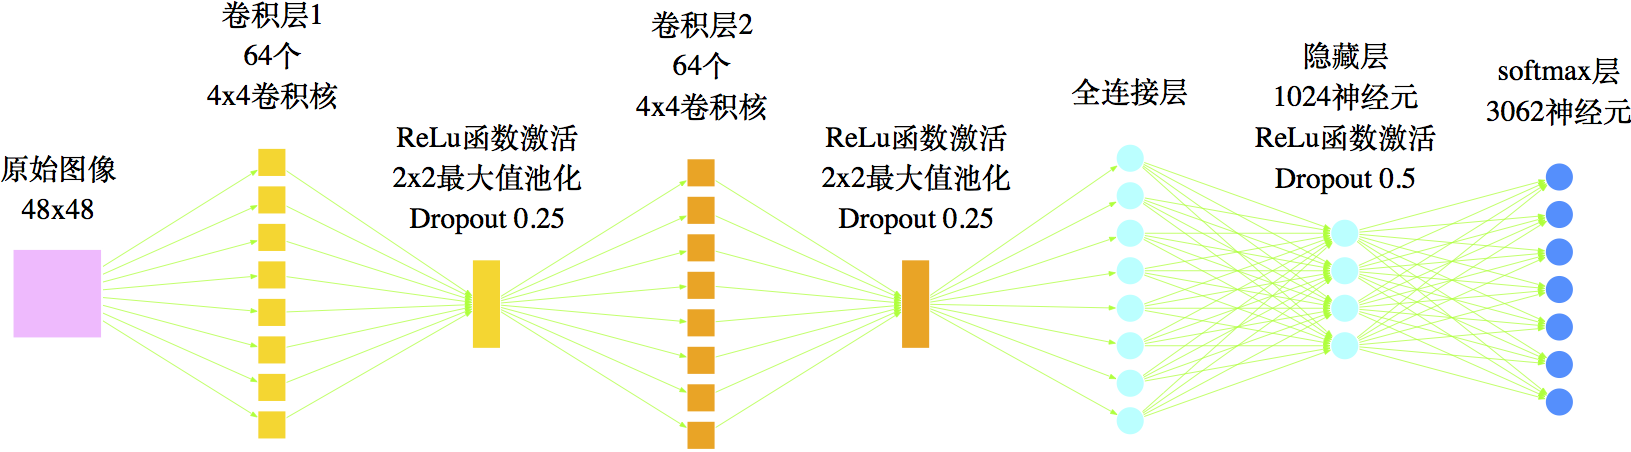 Figure 18: The network architecture used in this article for recognizing printed Chinese characters
After sufficient training, a network with the architecture in Figure 17 can achieve over 99% accuracy, demonstrating that this kind of structure is indeed a reasonable choice. But clearly, there are only 10 handwritten digits, while there are thousands of commonly used Chinese characters — in our classification task there are 3062 target classes in total. In other words, Chinese characters have a much more complex and finely structured form, so every aspect of the model needed to be adjusted. First, in terms of model input, we increased the image size from 28×28 to 48×48, which preserves more detail. Second, we made the model architecture more complex, including: increasing the number of convolution kernels, increasing the number of hidden units, and adjusting the weights. Our final network architecture is shown in Figure 18.
For the activation function, we chose the ReLU function:
$$ReLu(x)=\left\{\begin{aligned}&x,\quad x>0\\ &0,\quad x\leq 0\end{aligned}\right.\tag{13}$$
Experiments show that compared with traditional activation functions such as sigmoid or tanh, this greatly improves model performance [3][4]. To guard against overfitting, we used Dropout [5], the most commonly used technique in deep learning networks, which randomly puts a fraction of neurons to sleep — equivalent to training multiple different networks simultaneously — thereby preventing overfitting that individual nodes might otherwise exhibit.
It's worth pointing out that we actually did a great deal of tuning and selection work on the model architecture. For instance, for the number of neurons in the hidden layer, we spent several days trying values such as 512, 1024, 2048, 4096, and 8192, before finally settling on 1024 as a fairly suitable value. Too many neurons makes the model overly large and prone to overfitting; too few leads to underfitting and poor performance. Our tests showed that going from 512 to 1024 gave a clear improvement, while adding more nodes beyond that gave no clear improvement, and sometimes even caused a noticeable drop in performance.
Model Implementation
Our model was built on a server running CentOS 7 (24-core CPU + 96GB RAM + GTX 960 GPU), with code written in Python 2.7, using Keras as the deep learning library and Theano as the GPU acceleration backend (Tensorflow kept throwing out-of-memory errors and we couldn't get it configured properly).
For the training algorithm, we used the Adam optimizer, with a batch size of 1024, trained for 30 epochs, with each epoch taking roughly 700 seconds.
When characters look visually similar, the higher-frequency character is generally the more likely answer. The most typical example is "日" (rì) versus "曰" (yuē) — these two have very similar visual features, but "日" occurs far more frequently than "曰", so it should be given priority. Accordingly, during training we also adjusted the final loss function so that high-frequency characters carry greater weight, which improves the model's predictive performance.
After many rounds of tuning, we eventually arrived at a fairly reliable model. The convergence process of the model is shown below.
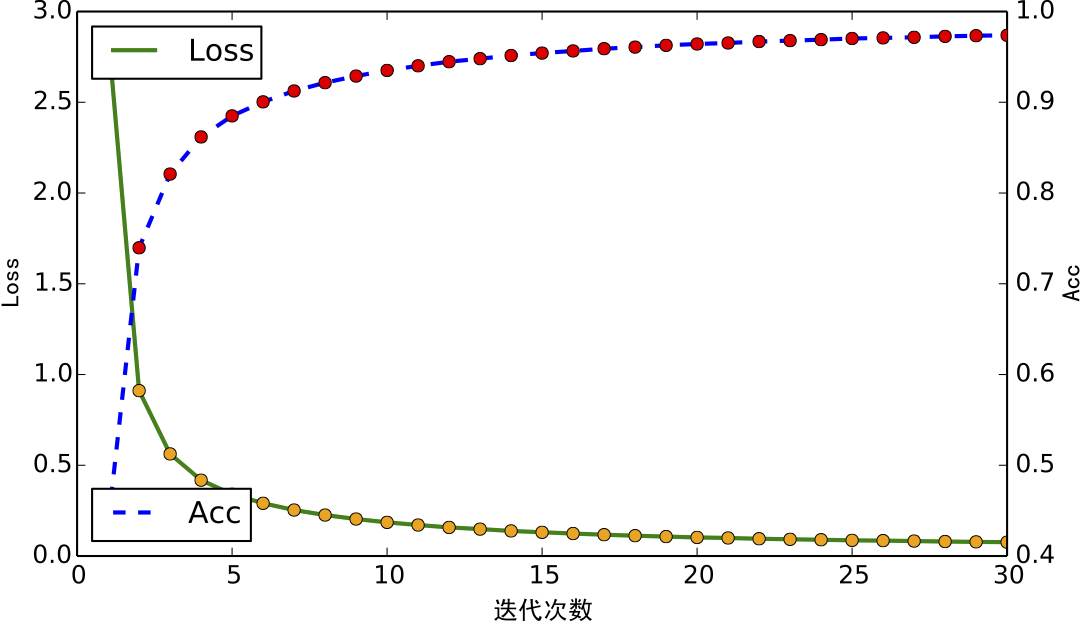 Training curve: Loss (loss function) and Acc (accuracy)
Model Evaluation
We evaluate the model along three dimensions. The experimental results show that, for single-character recognition, our model outperforms Google's open-source OCR system Tesseract.
Evaluation on the Training Set
The evaluation report for the final trained model on the training set is shown in Table 1.
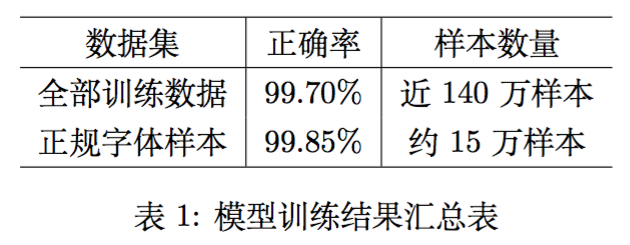 Summary table of model training results
As Table 1 shows, even on samples with added random noise, the model still achieves 99.7% accuracy. We can therefore confidently say that, purely in terms of single-character recognition, our results have reached state-of-the-art level, and for standard fonts (by "standard fonts" here we mean samples in Hei, Song, Kai, Microsoft YaHei, and Arial Unicode MS, which are the fonts commonly seen in printed text) the accuracy is even higher!
Evaluation on the Test Set
We additionally selected 5 other fonts and generated a batch of test samples using the same method (30,620 images per font, 153,100 in total) to test the model, obtaining a test accuracy of 92.11%. The test results for the five fonts are shown in Table 2.
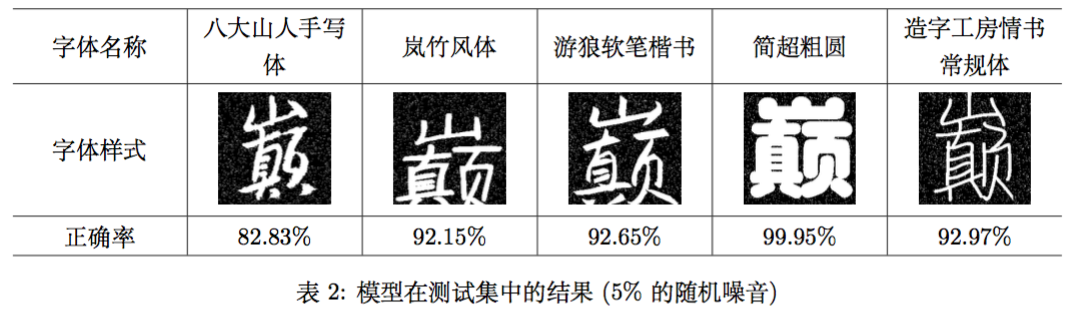 Model results on the test set (5% random noise)
As the table shows, even for samples outside the training set, the model performs quite well. Next, we increased the random noise to 15% (which is already quite severe for a $48\times 48$ character image), giving the test results shown in Table 3.
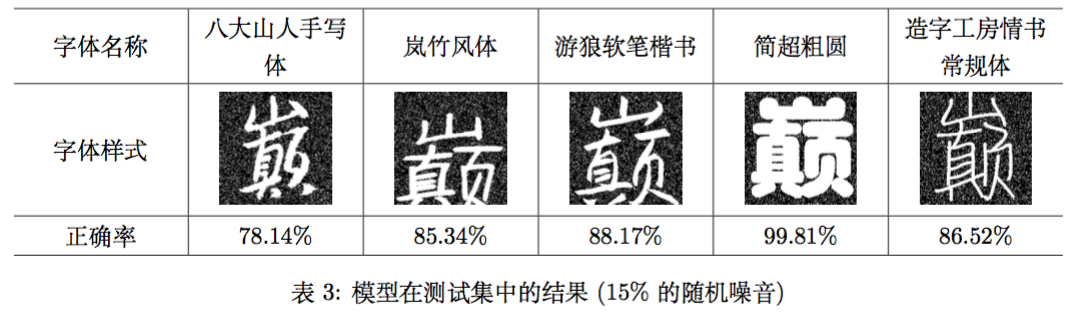 Model results on the test set (15% random noise)
The average accuracy here is 87.59%, meaning that the effect of the noise is not very pronounced — the model still maintains around 90% accuracy. This shows that the model has reached a level that is fully practical for real-world use.
Translated automatically with claude-sonnet-5; all equations are reproduced verbatim from the source. Copyright remains with the original author.